

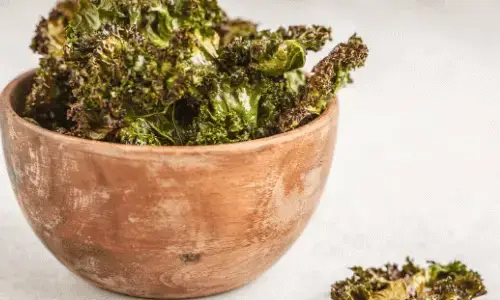
Just like many other greens, kale has so many nutrients to fuel your body well.
So regardless of what growing season it is, we need to find ways to get these nutrients year round.
Enter: Dehydrating (aka drying) kale.
Drying your leafy greens ensures that you have a stock to see you through the not so favorable seasons like winter.
There are 3 main ways kale can be dried:
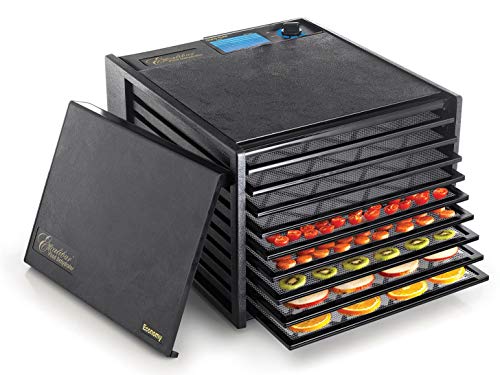
How to Dry Kale in a Dehydrator
Make sure to pick kale in its prime if you’re getting it from your garden or farmer’s market.
If you get it from the grocery store, look for fresh-looking kale with deeper colored leaves (which means they contain more chlorophyll as well as antioxidants).
Once you have your kale the next thing to do is pick out any leaves that have been eaten by insects.
You’ll also want to discard any slimy portions as well as brown ones.
When that’s done, wash the remaining leaves properly.
If there are any holes in them, you might want to soak the leaves for about an hour in cold water.
That’s because holes are more often than not an indication of damage caused by the cabbage butterfly caterpillar.
And if these worms are still on any of the leaves, soaking them will make them curl up and drop off.
Next step – dry off the leaves on a dish rack or with a colander.
Then take the leaves and chop off the heavy central rib in each of them using a sharp knife on a cutting board.
This is because the central rib – being thick and fibrous – proves difficult to dry.
In the event you decide to dry the rib anyway, I’d highly recommend you do it separately.
It can be ground into a fine powder that can be used for stews and soups.
The next thing to do is to chop the kale leaves into fine ribbons down to the very last leaf.
Put your chopped leaves into dehydrator trays and dry them until they are crumbly and crispy on medium heat.
This should take about 6 to 8 hours since kale dries quickly.
In case there’s any limpness in the leaves, dry them a little longer so that they don’t mold once you store them.
They should be stored in glass jars with tight-fitting lids.
Some people store the leaves whole, but I prefer to crumble them a bit as that’s what suits most of the recipes I use them in.
Prices pulled from the Amazon Product Advertising API on:
Product prices and availability are accurate as of the date/time indicated and are subject to change. Any price and availability information displayed on [relevant Amazon Site(s), as applicable] at the time of purchase will apply to the purchase of this product.
How to Dry Kale in an Oven
If you don’t own a dehydrator, no worries! Kale can easily be dried in the oven!
Just bear in mind that an oven uses higher temperatures compared to those of a dehydrator.
So you’ll want to use the lowest setting on your oven. For mine, that’s 200 degrees.
Here’s how to do it:
You’re going to begin the same way I previously mentioned – by sorting through any bad leaves, washing them thoroughly, and draining off excess water.
Once that’s done, cut off the stems and chop your leaves into sizable parts.
Lay your chopped kale in oven trays and put them in the oven.
Remember, set your oven to the lowest setting.
Since oven temperatures are higher than in a dehydrator, kale will dry up much faster – about 3 to 4 hours give or take.
Alternatively, you can simply leave your kale in the oven overnight with just the oven light on.
How Do You Air Dry Kale?
Air drying is the cheapest form of drying kale since it is an all-natural process – no equipment needed!
To air dry kale, wash it thoroughly after picking out the bad leaves. Go ahead and drain off excess water just like before.
Arrange the leaves with the stems facing outward and then tie the stems tightly using a butcher’s string.
Hang the kale in a place where it will get direct sunlight for a period of 2-3 weeks until the leaves are crispy.
You can also use a special hanging air dehydrator like the one below. I like it because it keeps the bugs out!

Prices pulled from the Amazon Product Advertising API on:
Product prices and availability are accurate as of the date/time indicated and are subject to change. Any price and availability information displayed on [relevant Amazon Site(s), as applicable] at the time of purchase will apply to the purchase of this product.
Store in glass containers and enjoy!
Is Dried Kale Still Good for You?
From a nutritional standpoint, dried kale loses some nutrients during the drying process – but not much.
Foods are always their most nutritious in their raw form.
However, looking at other methods of kale preparation like blanching, frying, and baking (at higher temps), drying is far better for nutrient retention.
So if you don’t like eating raw kale and are going to cook and/or prepare it one way or another, dehydrating kale is the way to go.
What Can You Do with Dried Kale?
Dried kale can be used in stews, smoothies, soups, and casseroles. You can also make chips with dried kale – my personal favorite,
Just add seasonings, cook it in the oven, and you have a delicious healthy snack that costs pennies compared to store-bought kale chips.
>>> READ NEXT: 7+ Delicious Kale Chip Recipes
How to Make Kale Powder
Making kale powder is easy too. All you have to do is take your dried kale and put it in a blender.
At first, pulse it several times while pausing to allow the leaves to settle.
Then once the leaves seem about the same size chunks, blend continuously for an even powdery result (about 1 minute).
See? Easy peasy 🙂
How Long Does Dried Kale Last?
Dried kale when stored properly can last 2-3 months. Just make sure you store it in glass jars and that the lid is tight.
Look out for signs of mold, and if it starts smelling weird, toss it.


hi question. I need to know how much dried kale per 16 ounces of a green drink do I use? I’m on warfarin and I have to drink a green glass every day .I’ve been making enough for a week store in jar in fridge I use 3 hand fulls of kale to blue berries or cucumber or what ever other I have and place in this jar to use every once a day this drying would help me so much but the question is how much ..linda
Hi Linda,
When I’ve dehydrated kale in the past, I could only get 2 big handfuls per tray. So 3 handfuls would be 1 1/2 trays worth, but then again, that amount would vary depending on hand size & dehydrator tray size. I would just dehydrated 3 handfuls of kale one day and see how much it comes to, then you’ll know for future reference. I’m sorry I can’t provide a more exact answer!
Great website. Thanks.
I dehydrate my garden produce using a panel type solar cooker. Fairly low heat and open to the air. Produce is covered with cheese cloth. This has been a rapid and inexpensive method for working the best produce from my small garden. So far this season: tomatoes, egg plant, zucchini, carrots, acorn squash. I dry some/eat some and try to use my dried stuff in stews.
Again, wonderfully informative website. With your permission, I would like to add a link.
Hi Jim, I’d be super interested to know what type of panel you use as a solar dehydrator. So if your link is related to that, then yes, you may place it in a comment.